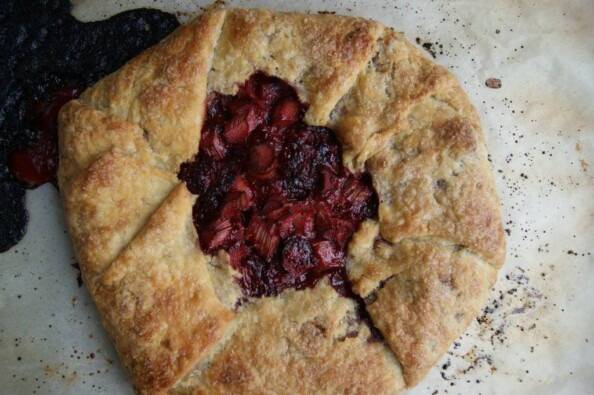
Rhubarb-Strawberry Galette
Rhubarb Strawberry Galettes are the ultimate in spring desserts. Perfect fruit-to-pastry ratio, great flavour, and my recipe comes with a great kitchen tip for making sure that the bottom crust is never soggy!
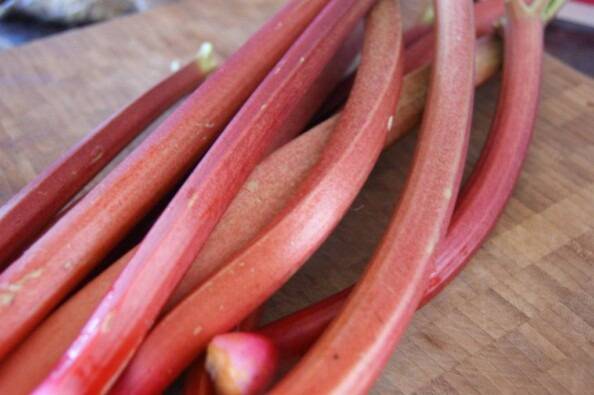
The rhubarb in my fridge has been calling to me lately. It’s been telling me that I should make Rhubarb Custard Bars, but I was feeling more pie-ish today. (Pies are my favourite dessert.) Also, I found a bag of locally-picked strawberries in the back of my freezer (oo-oops!), so these Rhubarb-Strawberry Galettes practically made themselves.
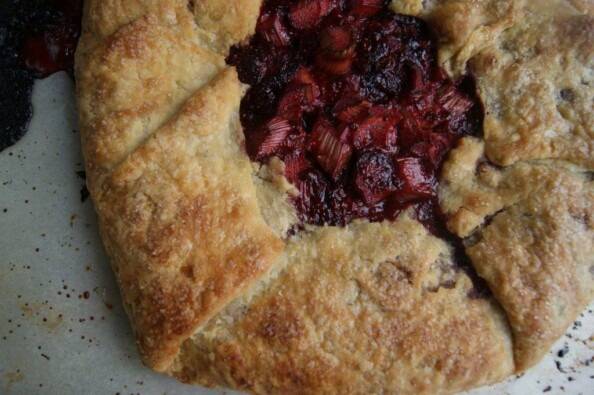
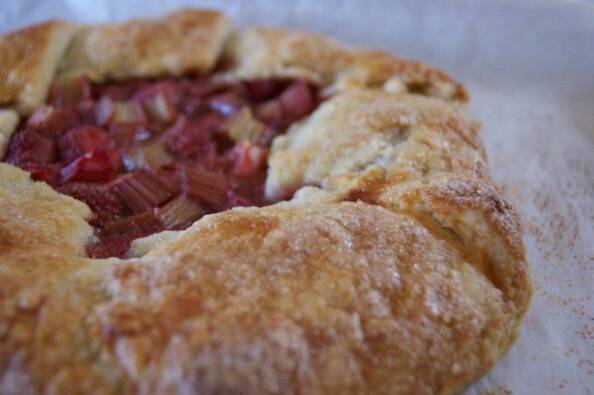
Galette is a French term for a rustic open-topped fruit pie. It contains the same ingredients as regular pie, but has way better fruit-to-pastry ratio, way less fuss, and you end up with two pies for the work of one. Because of their open top, they are especially well-suited to juicy berry fillings… you know, like 3-year-old frozen strawberries.
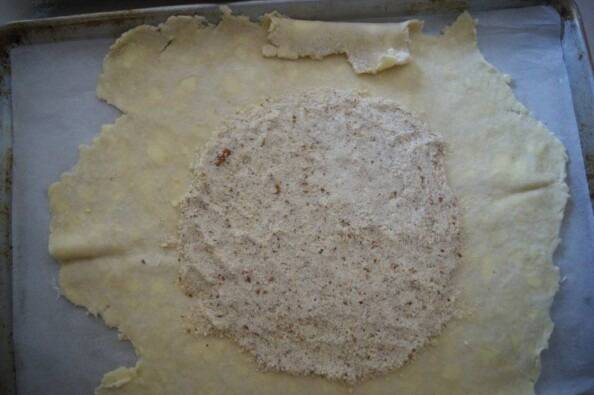
I also like to add a layer of ground, sugared nuts over the bottom pastry to provide a barrier between the juicy fruit and the bottom crust so the pastry stays nice and crisp.
Galettes are so easy and so delicious that I end up making them more often than regular pie. (And I’ve mentioned how much I love pie, right?) I love galettes so much that I’ve even blogged about them already here.
The rhubarb-strawberry galettes I made are almost cool now, so excuse me while I go eat a piece or two.
RHUBARB-STRAWBERRY GALETTE
Makes 2 Galettes
A galette is a French open-topped fruit pie, made without a pie plate. This is delicious, rustic, peasant food.
The mixture of toasted ground nuts, flour and sugar forms a protective barrier over the bottom crust, preventing it from getting soggy with absorbed juices. The nut mixture also helps to thicken and flavour the pie. The nut layer is an excellent choice for any very juicy fruit and works particularly well with this kind of rustic galette.
Pastry
2½ cups (12.5 oz) all-purpose flour, measured by the dip and sweep method
1 Tb sugar
1 tsp salt
¾ cup (6 oz) cold unsalted butter, cut into small cubes
½ cup (4 oz) cold lard, cut into small cubes (OR shortening, or butter)
7 to 9 Tb very cold water
Nut layer
½ cup sliced almonds
3 Tb flour
4 Tb sugar
Fruit filling
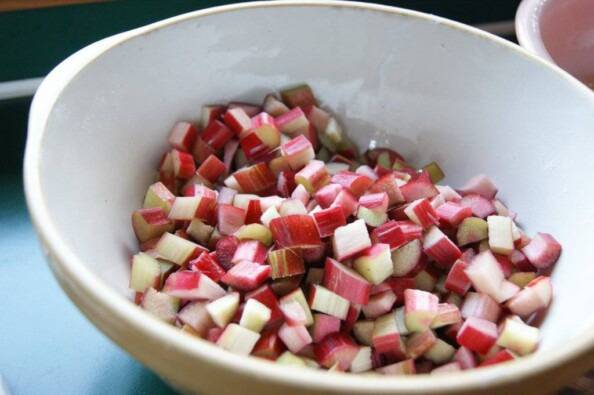
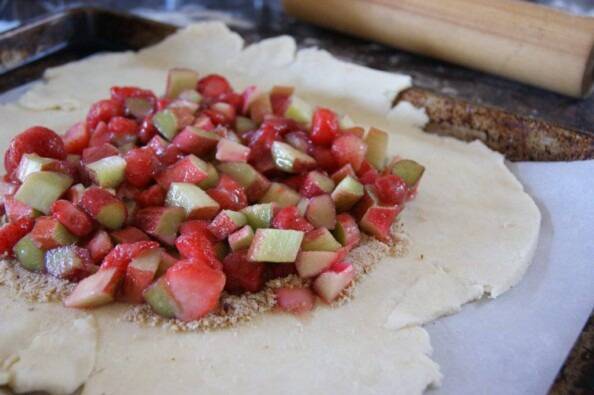
3 cups fresh or frozen local strawberries, washed, hulled, and halved or quartered
4 cups sliced fresh or frozen rhubarb
1 cup sugar
Glaze
1 egg white
1 Tb sugar for topping
Instructions
Pastry – Food processor method:
In the work bowl of a food processor, combine the flour, sugar, and salt. Process for a few seconds to combine evenly. Remove the lid, scatter the butter pieces over the flour, replace the lid, and process again, using 4 to 6 one-second pulses. Add the lard and pulse a few more times, until the fat is cut into the flour properly. The fat pieces should range in size between small peas and cornmeal, with fewer large pieces and greater smaller pieces. But make sure to leave some large pieces and some dry flour, because these two things help with the flakiness. Transfer the flour mixture to a bowl. Toss with fingers to ensure an even balance of fat to dry flour.
Pastry – Hand method:
In a medium bowl, combine the flour, sugar, and salt. Whisk to combine. Add the cold butter pieces and use your finger or a pastry blender to cut the butter into the flour. Rub the butter pieces gently between your fingers, coating them in flour, until they are half the size. Add the lard pieces and continue cutting in, until the fat is the right size, ranging in size from small peas to cornmeal. There should be more smaller pieces than big.
Pastry – To finish either method:
Slowly sprinkle in the water, two tablespoons at a time, using a fork or rubber spatula to mix the dough. Stop after 7 tablespoons of water, no matter what the dough looks like.
Turn the dough onto a counter. The dough will be very dry and crumbly at this point. Use your hands to gently gather the dough into a ball, using gentle pressure to make it hold together. If the dough is still too dry, sprinkle on a tablespoon more water and mix the dough with your hands again, until you can form it into a ball. In rare cases, you will need to use the final tablespoon of water.
Divide the dough in two and form each into a disk. This dough can be used immediately, or wrapped in plastic wrap and refrigerated or frozen for later use.
Roll out pastry dough. To roll out dough perfectly, make sure you start with a circle – a 4-inch flattened disk of dough, with rounded sides. Flour your work surface and your rolling pin. Lay the disk of dough on the work surface and use your rolling pin to make one roll over the dough, using gentle and even pressure. Rotate the dough a few degrees and roll again, out away from you and back towards you. Keep rotating and rolling, using more flour as necessary, until the dough is about 8 inches in diameter. Make sure you use the same amount of pressure over the whole roll. The rotating of the dough helps keep it in a circle shape.
Gently lift the dough and flip it over, adding more flour to the work surface before you place the dough back down. Continue rolling and rotating until the dough is about 14 inches in diameter but in the final stage of rolling out, place the dough on a large piece of floured parchment paper and continue to roll out until it forms a 14-inch circle. Place each dough round, along with parchment, on a cookie sheet. Refrigerate while making filling.
NOW Preheat oven to 425°F
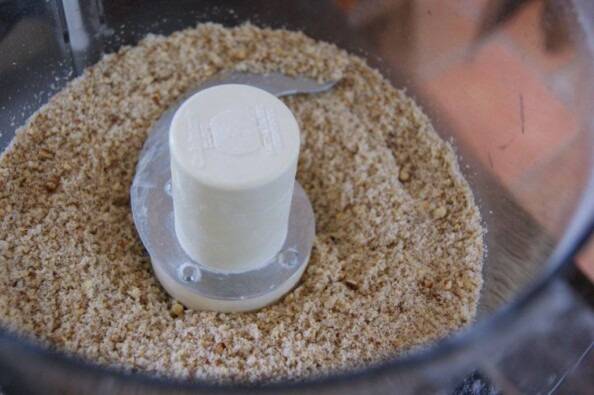
Filling: In the work bowl of a food processor, combine the sliced almonds, the 3 tablespoons of flour and the 4 tablespoons of sugar. Process until finely ground. Set aside.
In a large bowl, mix together the sliced fruit and 1 cup sugar.
Remove rolled-out pastry from refrigerator. Divide the nut mixture evenly between the pastry rounds, placing the nut mixture in the centers and spreading to a thin, even layer over the bottoms, leaving a 2- to 3-inch border all around.
Give the fruit filling a stir, and divide it evenly between the pastry rounds, being careful to pile the fruit mixture only over the nut mixture, not on the overhang. Make sure the filling is level.
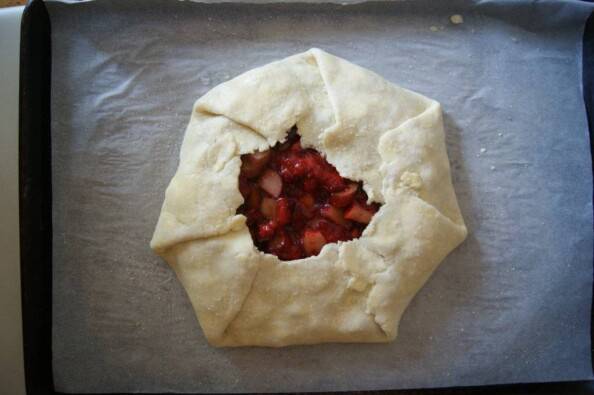
Gently lift the overhanging border dough and fold it over the filling, making nice folded scallops as you go. The center of the pie will be open. Brush top of pastry with egg white and sprinkle with sugar.
Place cookie sheets on the bottom rack of your oven (if they don’t fit side by side, put on on the bottom and one on the middle. Rotate frequently up-and-down and front-to-back while baking). Bake for about 20 minutes. Reduce heat to 375°F, rotate trays and move them up to the middle rack and bake for 35 minutes more, until pastry is deep golden and filling in center is thickened and bubbling. Remove trays from oven and place on trays to cool.
Let cool 2 hours before serving.


WOW! I made this late this afternoon for our dessert tonight and it is absolute perfection.
The crust is so butter-flavoured (I used only butter) and the filling was just right for sweetness.
Thank you so much for sharing a recipe that lets me use both this year’s local now-ready rhubarb and some local strawberries that I had tucked away in the freezer. Off to have a second helping! Mmmmmm.
That looks unreal. Can you send some by mail? ;)
Awesome blog! Cheers
oh yum…I tried this recipe today and it’s amazing! the crust is so nice and light. it’s also the first time I’ve worked with pastry (been meaning to take your pie class for ages!!) and your clear instructions made it easy peasy…I’ve always been a bit scared of working with pastries and dough. thank you!
Cindy! Thanks, and you are welcome.
Wow! This recipe looks awesome! I was just wondering can I use Tayberries instead of the Rhubarb Strawberry Mix? I have extra in my garden this year. I am also going to try your jam recipe. Thanks for the great websites. Heidi’s are so creative! -Heidi G
Heidi – yes, definitely! Tayberries make an excellent galette!
H
PS You website looks great as well. I agree – Heidis are creative :)
Can’t wait to try this recipe. It looks like a beautiful tasty dessert!
What perfection! I love the addition of the nut layer! The kids are coming for dinner and I’m so excited to have made this amazing dessert. It’ll be like you’re here sharing dinner Heidi! ❤️
Thank you and you are welcome Jody!! I hope everyone loves it!